.png)
Resistivity of Clay
- Maxwell Fazio
- Mar 17, 2019
- 4 min read
Updated: Oct 21, 2021
A deeper look at some different pedagogical approaches to this classic experiment.
Student task sheet is available in classroom resources.

A Great Experiment that You’ve Probably Seen Before—Worth Making Even Better
This year marks the fourth year that I’ve conducted this lab with my students and each year it has become a bit more refined. You can imagine the catharsis I felt when last year’s conductive dough FRQ (Q2) came out (even though my kids take the international version of the test). This lab is by no means an original idea and there are resources for it online, but I’ve yet to find resources that implement the experiment in a pedagogically desirable way. Below I take a look at a couple different approaches.
Quick Physics Review
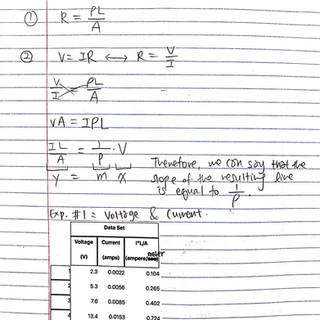
The equation for resistance is shown below.

Combining this equation with Ohm’s law yields an equation that describes current flow through an ohmic material.
V = IR
I = V/R
I = VA/𝝆L
The Setup
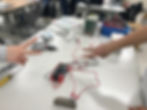
The only materials you need are a voltmeter, an ammeter, a variable power source, alligator clip wires, nails, and some clay or play doh. The gist of the experiment is simple. Have students mold some clay (or Play Doh) into a shape with uniform cross sectional area, then connect a power supply while measuring voltage across and current through the clay. Students can try manipulating the voltage of the source, the cross sectional area, or the length of the clay and look for effects on the current. With this setup it’s possible for students to draw conclusions about which factors effect resistance and to calculate a value for the resistivity of the clay.
Tip—You don’t actually need to cut the piece of clay shorter to decrease the length. Just change the distance between where the leads enter the clay.
Inquiry-Based Approach
If students have not learned the equation for resistivity yet, I would recommend utilizing the shell equation approach that I described in an earlier post. How you would structure this depends on whether or not they have learned Ohm’s law (V=IR). If they have, I might give them the shell equation:

with the objective of experimentally determining the exponents on each variable (m and n) and the constant C. Before beginning I would first, ask students to hypothesize as much as they could about the relationship. (Like whether they expect each variable to be in the numerator or denominator, and what physical characteristic C could represent.)
If they haven’t learned Ohm’s Law, I would consider giving them a different shell equation that incorporates V as an independent variable. Their goal would be to place the variables correctly into the equation using logical reasoning and experimental evidence to support their claims. Maybe something like this:

You would need to provide them with clear definitions of each variable ahead of time for this to be possible. Also, note that in order to make a claim about the equation, they don't need to actually run four different experiments and graph data for each. If you're short on time, just a couple data points for each is sufficient because you've already given them the fraction as a constraint they can use as a basis alongside their experimental evidence to support their claims. Also, resistivity is impossible to control, so--students would need to place that variable just using correct reasoning from its definition.
Application-Based Approach
This is the approach that I took in my class this year. We had already discussed Ohm’s law and the equation for resistivity, so I gave students the following objective:
Objective: Determine the resistivity of clay (𝝆) in two different ways. Do this by conducting two controlled experiments, creating two graphs, and then analyzing those graphs.
Why have them do it in two different ways?
It gives students ownership of the equation. By switching which variables are constant and which are manipulated they achieve a feeling of getting the equation to work for them.
It helps students build intuition for how changing more than one variable affects the system. If they only change the voltage for instance, they don’t actually observe what happens when they change the length. Even if they know there’s an inverse relationship between current and length, taking data and seeing that relationship emerge in confirmation of their hypothesis is a powerful experience.
Most importantly: this yields two different experimental values for 𝝆 which provides a staring point for asking them to write a meaningful, semi-quantitative error analysis.
There are actually three different independent variables that will work V, A, or L.
Prelab: Before students can begin taking data, they must:
Design their experiments.
Predict the shape of their graphs and hypothesize (justify) why they expect that shape.
Explain how they will use each graph to determine 𝝆.
Take a look at the student sample below to see how this objective could be achieved.
Error Analysis: This is where the lab becomes most rich. Asking students to discuss why their two 𝝆 values are different and whether they think they are greater/less than the actual value requires students to critically examine the experimental setup. Here’s a list of potential sources of error that might come up:
The clay dries out over time so data taken later yields higher resistivity.
The resistance of wires was not accounted for in the mathematical model. (This is actually pretty negligible but is rich for discussion. If students bring it up it’s worth discussing whether or not it’s actually significant.)
The clay has holes/abnormalities in it so it is not truly uniform cross-sectional area.
Even though the clay has uniform cross-sectional area, since the nails are so thin, current does not actually flow uniformly throughout that clay. Close to the nails, the cross-section is effectively less than what it is at the center.
Student Sample: A student sample is shown below. This particular student did an excellent job explaining her procedure and justifying her claims about the resistivity of clay using her graphs as evidence. In her error analysis she makes two strong claims about potential sources of error and justifies those claims through a quantitative comparison of her two resistivity values and logical reasoning with relevant concepts.